Showing posts with label Windows 7. Show all posts

Windows 10 preview free download with product key !

WINDOWS 10 free preview  download


While the whole world was waiting for the next generation of Windows operating system, i.e. Windows 9, but skipping right over 9, Microsoft has announced the next version of its Windows is Windows 10, disclosing its first details on Tuesday at an event in San Francisco.

The latest version of Microsoft’s flagship operating system, which will be available for everyone next year, brings back the popular Start Menu, which had been removed from Windows 8.

Windows 10 will be Microsoft’s single platform for developing apps across all devices, from Smartphones and tablets to desktop PCs. However, Windows 10 will not be a one-size-fits-all operating system and instead will vary a bit from device to device.

"Windows 10 will run on the broadest amount of devices. A tailored experience for each device," Microsoft's executive VP of operating systems, Terry Myerson said at a press event here Tuesday. "There will be one way to write a universal application, one store, one way for apps to be discovered purchased and updated across all of these devices."
"Some of these devices you hold in your hand, others are ten feet away," Microsoft said. "Some of these devices you primarily use touch/pen, others mouse/keyboard, others controller/gesture—and some devices can switch between input types. We’re not talking about one UI to rule them all—we’re talking about one product family, with a tailored experience for each device."
Codenamed as Windows Threshold, Windows 10 will come with customizable live tiles in the new Start menu, which will look familiar to Windows 7. Among other features, Windows 10 will provide new options for re-sizing windows, multiple desktops, and a convenient "task view" to switch between them.

The resizable tiles will provide users a quick view of notifications from relevant applications, such as details of new emails, Facebook messages, weather forecast updates and more.

Other features include Task View – which supports multiple desktops, and Snap Assist – which lets you grab apps from multiple desktops. The Windows command prompt has also been improved.

The announcement of an updated Windows operating system doesn't come as a complete surprise, as the leaked images of the latest Windows OS – under the codename "Threshold" – spreaded online which gave a closer look at Microsoft’s next major version of Windows. The only surprise is that the latest version of Windows is Windows 10, instead of Windows 9.

"We believe that, together with the feedback you provide us, we can build a product that all of our customers will love," Myerson said. "It will be our most open collaborative OS projects ever."
Microsoft has open up the OS to dedicated beta testers under its Windows 10 "Insider Program" for individuals to start testing and already reached out to companies to evaluate the new operating system as well. Windows 10 is still in its early stages of development and is expected to ship in mid 2015.

Download Windows 10 Technical Preview Edition
Read More

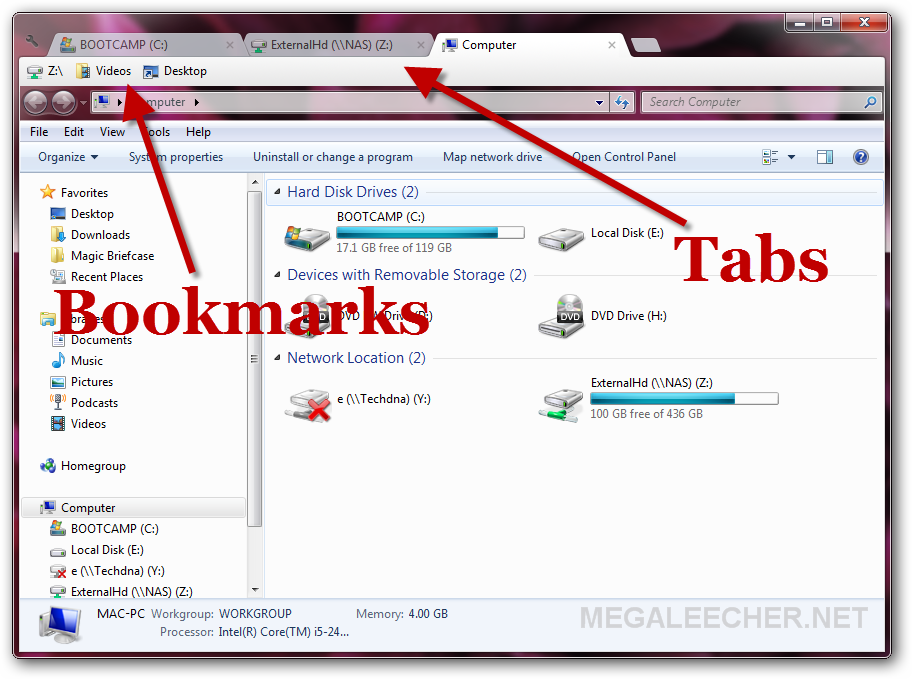
make windows explorer tab look like chrome....


to make u r windows explorer look like chrome we need to install a software called clover.

what us a clover ?


Clover is an extension of the Windows Explorer, to add multi-tab functionality similar to Google Chrome browser. After install Clover, you will be able to open multiple folders within the same window, and you can also add folder bookmarks.

we are providing clover for free u can download it here ...

software name :CLOVER
VERSION : 3.0.406

FREE FOR LETSHACK2DAY  readers ...

DOWNLOAD


Read More

Turn Your Laptop Into JARVIS From Iron Man !

You have probably heard about the Iron Man Personal Assistant,AKA J.A.R.V.I.S, you would have wondered if you could convert youlaptop/desktop into a full featured roboticassistant,you could do it.And it is pretty easy. Although you might not be able to launch missiles and deploy security armor, you can do easy tasks like asking for weather, shutting PC down, pimp its interface etc etc...


So Lets Get It Started,What Do You Need :

Windows 7 or 8 ( 7 is just great, 8 will work, vista will not )
Windows Speech Recognition Macros. (Link)
# A Bluetooth/Wireless Headset With Mic (optional)
# JARVIS Theme. (read below)

So That You Don't Get Confused :


We have divided the "convert-to-jarvis" mission into 3 Divisions :
- Training The Windows Speech Recognition Program.
- Setting Up The Windows Speech Macros.
- Setting Up The J.A.R.V.I.S Interface.

Step One : Train Your Windows Speech Recognition Program : 5 Minutes :


Yeah I Know, A Basic Step, But The Most Important part of "convert-to-jarvis" mission, what you gotta do is fire up thewindows speech recognition program, which comes pre-installed with the Windows, way to access it is via start bar. Now choose the required Fields,and after it is done, visit the  "Train your computer to better understand you" section, it is not necessary for people with clear voice/accent, but I strongly advise you to spend at least 5 Minutes on this so your computer can understand you better.

Step Two : Setting Up The Windows Speech Recognition Macros : 5 Minutes :


Now if you Have set-up-ed the Windows Speech Recog Program, you would have been trying out all sorts of cool commands, But now to spice it up, We'll use the Windows Speech Macros.I assume you would have already downloaded it from the link above and installed it.After Installing it i would advise you to put its shortcuts in two places, One in the desktop and other in the start-up folder, so it would start the second your computer boots up.So a little walk through to this software, This is a super-cool, little software that teaches your computer to talk to you interactively.Here is how to set up the commands :
Double Click The Macros Icon, and when the window pops up asking "What should the macro do?" click "Advanced." For those of you familiar with creating websites, this should be a welcome site. WSRM uses XML for commands... which makes creating custom commands relatively simple. For those of you who aren't aware of XML, it's still easy.Here Is A Little Sypnosis at what are you looking at :

<speechMacros> - This is the starting Tag, it just tells the computer that this XML file uses the Speech Macros to execute.

<command> - This is the command to be executed. Each command is basically one action... in most cases you will only need one, but for some automations you'll want to include more than one. You'll see an example of this later.

<listenFor></listenFor> - This tells the computer what word or phrase to listen for in order to do an action. Notice that there is a closing tag (</listenFor>), this tells the XML that this spot in the code is where to stop doing whatever function... in this case stop listening for a word or phrase once the computer hears it.

</command> - The closing tag for the "Command" tag... again, in XML every tag will have an opening/closing tag and what happens between the two is how it knows what to execute. In this case it knows that the command is finished once the word/phrase has been detected.

</speechMacros> - By now I think you can figure out why this is here.

Since I'm going to name my computer Jarvis, I'm going to tell my computer to listen for it's name by changing the <listenFor> tags to say the following :   <listenFor>Jarvis</listenFor>

Here Is A Little Applet That will teach my laptop to Reply Me :
_________________________________________________________________________________
<speechMacros>
<command>
<listenFor>Wake Up Jarvis</listenFor>
<speak>Systems Online, Database Check, Good Morning Sir !</speak>
</command>
</speechMacros>
_________________________________________________________________________________

So Whenever I Say "Hey Jarvis" My Computer will reply me with "System Online,Database Check, Good Morning Sir ! ", You can change it to whatever you like !

An Speech Macro For Getting The Weather :
_________________________________________________________________________________

<?xml version="1.0" encoding="UTF-16"?>
<speechMacros>
<command>
<listenFor>Pull up the weather in [CityName]</listenFor>
<run command="http://www.weather.com/weather/local/{[CityName.zipCode]}"/>
</command>
<command>
<listenFor>Is it cold in [CityName]?</listenFor>
<speak>Let me check... just a moment.</speak>
<script language="JScript">
<![CDATA[
<var xml_doc = new ActiveXObject("Microsoft.XMLDOM");
<xml_doc.async = false;
<xml_doc.load("http://www.rssweather.com/zipcode/{[zipCode]}/rss.php");
<var titles = xml_doc.getElementsByTagName("title");
<var descriptions = xml_doc.getElementsByTagName("description");
<Application.Speak(titles.item(2).text + " in {[*CityName]}");
<Application.Speak(descriptions.item(2).text);]]>
</script>
</command>
<listenForList name="CityName" propname="zipCode">
<item propval="65201">Columbia</item>
<item propval="37201">Nashville</item>
</listenForList>
</speechMacros>
_________________________________________________________________________________
A Macro To Restart The Computer :
You will just have to say "Nuke It!" and the computer will restart :
_________________________________________________________________________________

<speechMacros>
<command>
<listenFor>Nuke it</listenFor>
<speak>Rebooting The System.</speak>
<run command="C:\Windows\System32\shutdown.exe" params="-r -t 00"/>
</command>
</speechMacros>
_________________________________________________________________________________

Another One To Shut Down The Computer :
You will have to say "Goodbye Jarvis" And the Pc Will Shut Down :
_________________________________________________________________________________

<speechMacros>
<command>
<listenFor>GoodBye Jarvis !</listenFor>
<speak>Getting Offline,Bye Sir</speak>
<run command="C:\Windows\System32\shutdown.exe" params="-s -t 00"/>
</command>
</speechMacros>
_________________________________________________________________________________

Download This Pretty Little App And Extract It To C:\NIR\  and you will add more intelligence to your PC :

Volume Up:
<speechMacros>
<command>
<listenFor>volume up</listenFor>
<run command="C:\nir\nircmd.exe" params="changesysvolume +5000"/>
<speak>Volume Up</speak>
</command>
</speechMacros>
_________________________________________________________________________________

Volume Down:
<speechMacros>
<command>
<listenFor>volume down</listenFor>
<run command="C:\nir\nircmd.exe" params="changesysvolume -5000"/>
<speak>Volume Down</speak>
</command>
</speechMacros>
_________________________________________________________________________________

Volume Medium :

<speechMacros>
<command>
<listenFor>volume medium</listenFor>
<run command="C:\nir\nircmd.exe" params="setsysvolume 30000"/>
<speak>Volume at medium listening level</speak>
</command>
</speechMacros>
_________________________________________________________________________________

For More Interactivity, install Voice Search on Google chrome or some similar app in firefox !

Step Three : Pimping The Interface : 5 Minutes :

So well we have completed the talking and replying part, but we don't need the old crappy windows desktop, we need a kick ass interactive desktop so our computer looks like jarvis, to do that we will install this theme from Devianart . After that we will need to pimp up the start of windows, to do that we will download this little utility called Bootchanger, and getting a boot screen animation of your choice form here, then you are done.

Welcome To Jarvis !
Read More

We Can use our USB as RAM

USE YOUR PENDRIVE AS YOUR SYSTEM RAM

1) First Insert the Pen Drive atleast having an memory of 1GB ,( Preferably 4GB) in the Given USB port of the Computer
2) Wait for the Pen Drive Detection and see whether it is detected or not
3) After detection of Pen Drive, you should do the following things Carefully
4) Now go to My Computer and right click it, then go to the Properties
5) Now go to Advanced and then to the Performance settings
6) Now again Advanced, and go to Change
7) In the Change, select the pen drive which u inserted
Then click on the Custom size and ” check the value of space available ”
9) Please Enter the Same in the Initial and Maximum Columns also
10) Now your Pen drive space is used for the System Virtual Memory , Just Restart and enjoy the Faster and Furious PC
Warning : Try at u r own risk.

Read More

Fasten the copying speed of your usb


If your Pen Drive File Transferring speed is slow here is the way to speed up the coping files on pen drive

> Connect your pen drive
> go to “my Computer”
> Right Click on “Removable device” which is your Pen Drive letter
> Now Select the Last Option that is “Properties”
> Go to “Tools” option
> Select “check disk error” and Click OK
> Now Again Right Click on your Pen drive and Select “Format” option
> Click on “Default value”
> uncheck (unmark) the “Quick Format” option
> Click on Format

WARNING :
  • Plz wait as this will take some time to finished
Read More

Password Protection to USB Drive without using Software

Today I'm gonna talk about USB Drives.

I'll show you a simple trick to lock your USB drive without using any 3rd party software.
Most of the people doesn't like other people checking their personal files and folder on USB, including me. This insecure situation creates a huge space to theft our personal data by someone. If you use password protection to your USB, you can reduce the data theft.

Lots of USB password protect software available in present market, but you want to pay money to use it for lifetime. If you're using Windows you don't need any software.


Password Protection to USB Drive without using Software
So let's see how to set a password protect on your USB without using any software.

Insert your USB drive to computer
Click on Start
In "Search programs and files" box, type Bitlocker Drive Encryption
Now launch that application.


Password Protection to USB Drive without using Software

Then look for your USB drive and click on Turn on Bitlocker


Password Protection to USB Drive without using Software

Windows will ask you to set a password. 
Now set a strong password.
Click on Next

Password Protection to USB Drive without using Software

If you want save the password in a safe place.
And click on Next


Password Protection to USB Drive without using Software

Now click on Star Encrypting


Password Protection to USB Drive without using Software

That's all !!! :)
From right now if someone tries to access your USB, Windows will ask him/her to enter the current password.

Warning : This trick will works only in Windows
Read More

EIGHT Registry Hacks to Tweak Your Windows PC

Microsoft Windows offers a feature-rich interface and several customization options that make it one of the most user friendly operating systems in the world. However, computer geeks would still love to hack the Windows Registry so as to add more extra features and functionalities to their operating system.
If you’re one such geek who would like to customize Windows in your own way, here is a list of 8 interesting registry hacks that you need to try:

1. Disable USB Devices:

Disabling USB ports can be a smart idea to add security to the computer. This can be really handy if the computer is on a public place where the chances of virus and other malware infection is really high. You can easily disable access to USB ports with the following registry hack:
  1. Open the Registry Editor (Start -> Run -> Type regedit and hit Enter)
  2. In the registry, navigate to the following key:
    HKEY_LOCAL_MACHINE\SYSTEM\CurrentControlSet\Services\UsbStor
  3. In the right-side pane, double-click on “Start”.
  4. In the “Value data” field enter 4 and click on “OK”.
  5. Close the Registry Editor and reboot.
To enable USB devices, follow the same procedure as above except in the step-4 enter 3 in the “Value data” field.
Works on Windows XP, Vista and 7.

2. Disable Notification Balloons in Windows 7 and Vista:

You can now disable the annoying notification balloons that keeps popping up frequently with warning messages and reminders. Here is a step-by-step procedure to do that:
  1. Open the Registry Editor and navigate to the following key:
    HKEY_CURRENT_USER\Software\Microsoft\Windows\CurrentVersion\Explorer\Advanced
  2. Right-click on the right-hand pane, and create a new “DWORD”.
  3. Rename it to EnableBalloonTips, double-click on it and set the “Value data” to 0. Reboot the computer to see the changes in effect.

3. Add “Recycle Bin” to My Computer in Windows 7 and Vista:

Would you like to add the “Recycle Bin” icon to My Computer so that you need not go back to the desktop to access it when required? Well, here is how you can do that:
  1. Open the Registry Editor and navigate to the following key:
    HKEY_LOCAL_MACHINE\SOFTWARE\Microsoft\Windows\CurrentVersion\Explorer\MyComputer\NameSpace
  2. Right-click on “NameSpace” and select New -> Key. Name the key with the following name:
    {645FF040-5081-101B-9F08-00AA002F954E}
  3. Now, open “My Computer” and hit F5 to refresh the screen. This should show up the “Recycle Bin” icon.

4. Disable the Windows Task Manager:

Need to limit access to your computer by disabling the Task Manager? Here is a simple registry hack to do this:
  1. Open the Registry Editor and navigate to the following key:
    HKEY_CURRENT_USER\Software\Microsoft\Windows\CurrentVersion\Policies
  2. Right-click on “Policies”, select New -> Key and name the key as System.
    If you are on Windows XP, you need not create the new key “System” as it is already present in it. So, you can directly navigate to: HKEY_CURRENT_USER\Software\Microsoft\Windows\CurrentVersion\Policies\System in the Step-1 itself.
  3. Right-click on “System”, create a new “DWORD” and name it to DisableTaskMgr.
  4. Double-click on the DWORD “DisableTaskMgr” and set the “Value data” to 1 (0=Enable, 1=Disable).
  5. To enable the Task Manager, Set the “Value data” back to 0.
Works on Windows XP, Vista and 7.

5. Change the Registered Owner and Organization Name:

Here is a simple hack to change the name of the Registered owner on your computer:
  1. Open the Registry Editor and navigate to:
    HKEY_LOCAL_MACHINE\SOFTWARE\Microsoft\Windows NT\CurrentVersion
  2. On the right-side pane, find the keys RegisteredOwner and RegisteredOrganization. Double-click on them to change the names to whatever you want.
  3. To see the changes, right-click on “My Computer” and select “Properties”.
Works on Windows XP, Vista and 7.

6. Add Programs to Windows Startup:

You can now add your favorite programs to Windows Startup without the need for using the start-up folder. Here is a way to do this:
  1. Open the Registry Editor and navigate to the following key:
    HKEY_CURRENT_USER\Software\Microsoft\Windows\CurrentVersion\Run
  2. On the right-side pane, create a new “String Value” and rename it to the name of the program that you want to add (you can give any name, it doesn’t matter).
  3. Double-click on the “String Value”, in the “Value data” field add the path of the executable program that has to execute at startup.
  4. Reboot the computer to see the changes in effect.
Works on Windows XP, Vista and 7.

7. Add “Pin to Start Menu” Option for Folders in Windows 7 and Vista:

Ever wanted to pin a folder to the start menu to gain faster access to it? Well, it is possible to add the “Pin to Start Menu” option so that you can plug your favorite folders to Start Menu. Here is a step-by-step procedure:
  1. Open the Registry Editor and navigate to:
    HKEY_CLASSES_ROOT\Folder\shellex\ContextMenuHandlers
  2. Right-click on “ContextMenuHandlers” and select New -> Key. Name the key as follows:
    {a2a9545d-a0c2-42b4-9708-a0b2badd77c8}
  3. Now, whenever you want to add a folder to Start Menu, hold down the Shift key and right-click on the folder. You should see the “Pin to Start Menu” option in the context menu”.

8. Disable “Aero Shake” in Windows 7:

One of the new additions to Windows 7 is the “Aero Shake” feature using which it is possible to grab a window using its title bar and shake it. This will minimize all the other open windows if any. It is really a handy feature! However, if you ever wanted to disable this feature, here is a solution:
  1. Open the Registry Editor and navigate to the following key:
    HKEY_CURRENT_USER\Software\Policies\Microsoft\Windows
  2. Now, right-click on “Windows” key and create a new Key called Explorer.
  3. Right-click on the “Explorer” key and create a new “DWORD” called NoWindowMinimizingShortcutsand set its value to 1.
  4. Close the Registry Editor and reboot the computer to see the changes in effect.
Read More
Designed By Seo Blogger Templates