VMware is easy since VMware tools ( Not official, with VGA driver) available, but setting up screen resolution in VirtualBox is slightly different for each installation methods.
Method -1
If you installed Mac OS X by any of the hacked (hackintosh) ISO files, then do this first. ( This works for original retail DVD installations also)
You could see com.apple.Boot.plist file in /Extra folder. Before continue the next steps, first edit this file under /Extra with mentioned strings in step 3.
This may give the required resolution without editing the file under /Library/Preferences.
If this doesn’t work then modify com.apple.Boot.plist under /Library/Preferences as shown below
Increase Mac OS X Snow Leopard Virtual Machine Screen Resolution in VirtualBox
1) Start the Virtual Machine.
2) Open /Library/Preferences/SystemConfiguration/com.apple.Boot.plist in Text editor.

3) Type
<key>Graphics Mode</key>
<string>1280x1024x32</string>
1280x1024x32 – is your option. Type the correct screen resolution which matches your monitor.
Here is the screenshot of my file.

4) Select Save As in Text editor file menu and save it on desktop or somewhere else.
Make sure to save with same .plist file. ( Remove the tick as mention below)

5) Now, copy or drag com.apple.Boot.plist file from desktop to/Library/Preferences/SystemConfiguration/ or /Extra location where ever it needs to be replaced.
Enter Mac root (admin) password to authenticate replacing file.
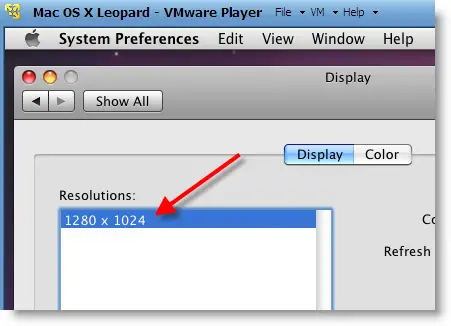
6) That’s it. Restart the Mac Virtual machine. By default Mac OS X will go to the screen resolution you set up com.apple.Boot.plist. Check it by going to ‘Display’ under ‘System preferences’.
I didn’t invent this; I just illustrated which mentioned here.
Method -2
Try this method if method 1 fails.
This method to modify VirtualBox settings for specific virtual machine.
Close VirtualBox completely and run following command,
VBoxManage setextradata “VM name” “CustomVideoMode1″ “1280×800×32”
“VM name” – Excact virtual machine name of Mac OS X, execute this command with Quotes.
Make sure VBoxManage command added to Windows path or you are running it from VB working folder.
The above command will modify XML file of Virtual machine. Just boot and see whether its working.
If not, while booting at the EFI boot loader screen, type;
“Graphics Mode”=”1280x800x32” and press Enter.
Always better to give the same screen resolution size mentioned in com.apple.Boot.plist file.
Method -3
This is similar to method 2, but slighlty different.
Execute this command in VirtualBox folder:
VBoxManage setextradata “VM name” VBoxInternal2/EfiGopMode 3
“VM name” – Excact virtual machine name of Mac OS X, execute this command with Quotes.
No 3 – this is the number of video modes. Only 5 resolutions are supported:
0 – 640×480
1 – 800×600
2 – 1024×768
3 – 1280×1024
4 – 1440×900
1 – 800×600
2 – 1024×768
3 – 1280×1024
4 – 1440×900
Or you can add a string on Virtual machine’s XML file to execute this command every time while machine is coming up.
<ExtraDataItem name=”VBoxInternal2/EfiGopMode” value=”3″>
Warning – If you are copying any of the commands from this post, make sure opening and closing quotes are correct!!
I’m sure one of this will work with VirtualBox to increase Snow Leopard screen resolution. Special thanks to Sysprobs readers who left valuable comments.
Share your success and failure stories on this method.We will fix it together.
No comments:
Post a Comment