ABOUT

About letshack2day

Welcome 2 letshack2day ~ A Blog that talks about Technology,Internet Security,Tricks & Tips and Ethical Hacking.

letshack2day is a place to explore, enjoy, and apply what have we learnt in real life about the facts of computer's. This blog is all about exploring the Facts and exploiting the faults.


WHO IS BEHIND LETSHACK2DAY


I am kedharinath, a computer engineering student from india. 

    My intention to start this site is only for sharing my views ,ideas and the information i had about 

computer software's and computers with the world .  You can read more about me or connect 

with me on facebook,twitter and google+.
Read More

EIGHT Registry Hacks to Tweak Your Windows PC

Microsoft Windows offers a feature-rich interface and several customization options that make it one of the most user friendly operating systems in the world. However, computer geeks would still love to hack the Windows Registry so as to add more extra features and functionalities to their operating system.
If you’re one such geek who would like to customize Windows in your own way, here is a list of 8 interesting registry hacks that you need to try:

1. Disable USB Devices:

Disabling USB ports can be a smart idea to add security to the computer. This can be really handy if the computer is on a public place where the chances of virus and other malware infection is really high. You can easily disable access to USB ports with the following registry hack:
  1. Open the Registry Editor (Start -> Run -> Type regedit and hit Enter)
  2. In the registry, navigate to the following key:
    HKEY_LOCAL_MACHINE\SYSTEM\CurrentControlSet\Services\UsbStor
  3. In the right-side pane, double-click on “Start”.
  4. In the “Value data” field enter 4 and click on “OK”.
  5. Close the Registry Editor and reboot.
To enable USB devices, follow the same procedure as above except in the step-4 enter 3 in the “Value data” field.
Works on Windows XP, Vista and 7.

2. Disable Notification Balloons in Windows 7 and Vista:

You can now disable the annoying notification balloons that keeps popping up frequently with warning messages and reminders. Here is a step-by-step procedure to do that:
  1. Open the Registry Editor and navigate to the following key:
    HKEY_CURRENT_USER\Software\Microsoft\Windows\CurrentVersion\Explorer\Advanced
  2. Right-click on the right-hand pane, and create a new “DWORD”.
  3. Rename it to EnableBalloonTips, double-click on it and set the “Value data” to 0. Reboot the computer to see the changes in effect.

3. Add “Recycle Bin” to My Computer in Windows 7 and Vista:

Would you like to add the “Recycle Bin” icon to My Computer so that you need not go back to the desktop to access it when required? Well, here is how you can do that:
  1. Open the Registry Editor and navigate to the following key:
    HKEY_LOCAL_MACHINE\SOFTWARE\Microsoft\Windows\CurrentVersion\Explorer\MyComputer\NameSpace
  2. Right-click on “NameSpace” and select New -> Key. Name the key with the following name:
    {645FF040-5081-101B-9F08-00AA002F954E}
  3. Now, open “My Computer” and hit F5 to refresh the screen. This should show up the “Recycle Bin” icon.

4. Disable the Windows Task Manager:

Need to limit access to your computer by disabling the Task Manager? Here is a simple registry hack to do this:
  1. Open the Registry Editor and navigate to the following key:
    HKEY_CURRENT_USER\Software\Microsoft\Windows\CurrentVersion\Policies
  2. Right-click on “Policies”, select New -> Key and name the key as System.
    If you are on Windows XP, you need not create the new key “System” as it is already present in it. So, you can directly navigate to: HKEY_CURRENT_USER\Software\Microsoft\Windows\CurrentVersion\Policies\System in the Step-1 itself.
  3. Right-click on “System”, create a new “DWORD” and name it to DisableTaskMgr.
  4. Double-click on the DWORD “DisableTaskMgr” and set the “Value data” to 1 (0=Enable, 1=Disable).
  5. To enable the Task Manager, Set the “Value data” back to 0.
Works on Windows XP, Vista and 7.

5. Change the Registered Owner and Organization Name:

Here is a simple hack to change the name of the Registered owner on your computer:
  1. Open the Registry Editor and navigate to:
    HKEY_LOCAL_MACHINE\SOFTWARE\Microsoft\Windows NT\CurrentVersion
  2. On the right-side pane, find the keys RegisteredOwner and RegisteredOrganization. Double-click on them to change the names to whatever you want.
  3. To see the changes, right-click on “My Computer” and select “Properties”.
Works on Windows XP, Vista and 7.

6. Add Programs to Windows Startup:

You can now add your favorite programs to Windows Startup without the need for using the start-up folder. Here is a way to do this:
  1. Open the Registry Editor and navigate to the following key:
    HKEY_CURRENT_USER\Software\Microsoft\Windows\CurrentVersion\Run
  2. On the right-side pane, create a new “String Value” and rename it to the name of the program that you want to add (you can give any name, it doesn’t matter).
  3. Double-click on the “String Value”, in the “Value data” field add the path of the executable program that has to execute at startup.
  4. Reboot the computer to see the changes in effect.
Works on Windows XP, Vista and 7.

7. Add “Pin to Start Menu” Option for Folders in Windows 7 and Vista:

Ever wanted to pin a folder to the start menu to gain faster access to it? Well, it is possible to add the “Pin to Start Menu” option so that you can plug your favorite folders to Start Menu. Here is a step-by-step procedure:
  1. Open the Registry Editor and navigate to:
    HKEY_CLASSES_ROOT\Folder\shellex\ContextMenuHandlers
  2. Right-click on “ContextMenuHandlers” and select New -> Key. Name the key as follows:
    {a2a9545d-a0c2-42b4-9708-a0b2badd77c8}
  3. Now, whenever you want to add a folder to Start Menu, hold down the Shift key and right-click on the folder. You should see the “Pin to Start Menu” option in the context menu”.

8. Disable “Aero Shake” in Windows 7:

One of the new additions to Windows 7 is the “Aero Shake” feature using which it is possible to grab a window using its title bar and shake it. This will minimize all the other open windows if any. It is really a handy feature! However, if you ever wanted to disable this feature, here is a solution:
  1. Open the Registry Editor and navigate to the following key:
    HKEY_CURRENT_USER\Software\Policies\Microsoft\Windows
  2. Now, right-click on “Windows” key and create a new Key called Explorer.
  3. Right-click on the “Explorer” key and create a new “DWORD” called NoWindowMinimizingShortcutsand set its value to 1.
  4. Close the Registry Editor and reboot the computer to see the changes in effect.
Read More

Use Wikipedia without Internet Connection

Wikipedia site is a huge, open site which is very popular among people in the world. It is a massive search for knowledge. There are 3.8 million English articles found on Wikipedia.

Use Wikipedia without Internet Connection

Everyone knows that Wikipedia is used with the internet connection. This situation cannot be found on every people. To overcome this problem, Wikipedia has a feature, where people can access it even in loss of internet connection.

It is the “Pocket Wikipedia”software, which allows you to access in this manner. It has 14 million articles with 24,000 images. It supports Windows and Linux.


Read More

Unlock USB modems within 60 seconds

When unlocking USB modems, people go to certain PC repairing shops and pay high amount of money to get their USB modems unlocked, but to triumph over this problem, there is a program called “DC Unlocker”.
Unlock USB modems within 60 seconds 

DC unlocker is a program specialized for data card unlocking. It is easy to use and very fast, it takes just only 5-60 seconds to unlock.

Few features

New models are being added regularly.
Free updates.
Doesn't need any cable or adapters.
No needs to select any COM ports, auto detect function.


Read More

Enable Google Multiple Account Login in Same Browser

We all know that Google developer team has introducing lots of new features everyday for Google lovers.
They have introduced Google rolling out multiple account sign-in feature for Google users. Now you can login to multiple account at the same time. Most of us have more than one account for several different reasons. So hereafter you don't need to use different web browsers for logins.


How to Enable Google Multiple Account Login in Same Browser
How to Enable this feature

While you login to your account make sure to tick “Stay signed in” check box.


Go to this page and click enable this feature.


How to Enable Google Multiple Account Login in Same Browser

After that, you can add multiple accounts in the appearing window.

NOTE : Do not enable this feature on public computers.
Read More

How to Protect Shared Files on Google Drive by Disabling Download Option

You can upload any files to Google Drive and share with your friends at any time, any where. If you share a file with your friends on Google Drive, particular person can download that file to their computer. This is the default setting on Google Drive.


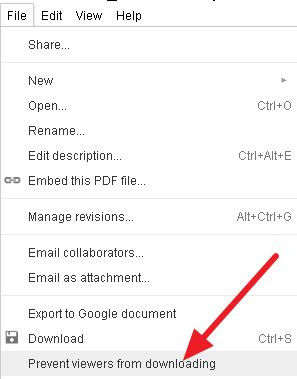
Protect your Shared Files on Google Drive by Disabling Download Option

But there is a method available to "disable downloading option" on Google Drive for protect your files from others.


So let's see how to disable download option on Google Drive

Sign into to your Google Drive account and open the file which will you share

Now go to file menu and click Prevent Viewers from Downloading


Protect your Shared Files on Google Drive by Disabling Download Option

That's all, you have done !!!

After that as usual hit share button and share your files with friends.

Now downloading option has been disabled on your Google drive account. If someone tries to download your shared files, they won't be able to see a downloading option on Google Drive.
Read More

Annoy your Friend using batch file Virus!

Do you wanna annoy your friend with a simple batch file virus?!!!
It’s very easy. Create a simple batch file virus and run it on your friend’s computer and watch him/her bothering about it.

To do this, type the followingcode in a notepad.

@ECHO off
:Begin
msg * Hi
msg * I am a virus!!!
msg * Do you wanna have fun with me?
msg * But before that, let me delete all your PC data 
msg * Ooops! I'm sorry for that!!!
GOTO BEGIN

Save this file as virus.bat
Now he/she will find irritation when opening this file :)

Don't worry after enjoying your friend's long face you can delete this file too, by following the method below.

Right Click on Virus.bat file, select Edit
and delete the last two words (GOTO BEGIN) in the appearing notepad window.
And save it again.

Now you can delete this "Virus.bat" file and continuously hit enter for the appearing messages.

Tell bye bye to your nuisance :)
Read More

How to protect PC with BIOS password?

BIOS stands for Basic Input Output System. It helps to boot your computer. Securing your data is important, because you may have something personal or official data in your machine which you wouldn't want to share with others. One way to protect your PCs is to set passwords, however such type of protection is basic and will be subjected to a number of exploits.

BIOS helps to secure your computer and protect it. If you set passwords on your BIOS, when someone  tries to access your BIOS and make changes on your settings, definitely the BIOS will ask the user's password.


How to set BIOS password?
  • Restart your computer.
  • While the operating system boots up tap F2 or Del key to enter setup.
  •  In the Basic Input Output System menu access the heading labeled “Security.” You need to do this by pressing the right arrow key of the keyboard.
  • To get to the “Supervisor Password” option, scroll down through the “Security” options and tap the down arrow key and hit “Enter” once you get the option.
  • Enter password in the text box that appears on the screen. Hit “Enter” to confirm password.
  • Now you need to access the “Exit” option at the far right side of the BIOS menu.
  • Keep pressing the down arrow key until you reach the “Exit Saving Changes” option.
  • Press “Enter” to open a new menu and press “Enter” again confirm the new settings.
  • Restart your computer again.
The only problem when using BIOS is, the users have to remember the password, otherwise it may lock you out if you forget the password.
Read More

Check who else connected on your Wi-Fi

Anyone can access internet through your wireless network, but this is not identical. To identify this, “Wireless Network Watcher” is been introduced.


Check who else connected on your Wi-Fi

Wireless Network Watcher is a utility that scans the wireless network and shows a list of all PC and devices connected to your wireless network. For any computer or device that is connected to your network,
The following information will be displayed.


IP Address
MAC Address
The company that manufactured the network card
Optionally the computer name


Read More

How to Upgrade your PC to Windows 8

This week's top story is Microsoft's Windows 8 operating system. So today Computer World is gonna explain you that how to upgrade your PC to Windows 8 operating system. First of all check the minimum system requirement and other requirement  to run Windows 8 on a PC. Click Here to Know the Minimum System Requirement for Windows 8.


How to Upgrade your PC to Windows 8


How to upgrade your PC to Windows 8

Before buying Windows 8 operating system download the Windows 8 Upgrade Assistanttool and run it on your computer. This free tool will check your PC's specification to install Windows 8. Windows 8 Upgrade Assistant tool do a complete scan and gives you a report about PC hardware and apps.


If this free tool find that your PC can run Windows 8, it will recommend you which edition to buy and some more suggestion. You can purchase Windows 8 here


How to Upgrade your PC to Windows 8


Note : 
If you are upgrading your computer from Windows 7 operating system, all the files and apps will be automatically added to Windows 8. If you are upgrading your computer from other Windows versions, you have to re-install all the apps manually for Windows 8 OS.

After the upgrade of Windows 8 OS, you cant go back to previous version of Windows which you had on your PC. If you want to go back to previous OS, you have to re-install it again.
Read More

All Shortcut Keys of Windows 8

We all know that recently Microsoft has released its much hyped product of Windows 8.
Day to day large amount of Windows lovers are moving their PC to Windows 8 OS.

So today we'll have a short look on Windows 8 Shortcut keys. Windows 8 consist large number of shortcuts to make your stuff more easy.


All Shortcut Keys of Windows 8


List of Windows 8 Shortcut Keys

Some of the shortcut keys are used on Start screen and some other keys are used in desktop.

Ctrl+plus (+) or Ctrl+minus (-)  - Zoom in or out of apps pinned to the Start screen
Ctrl+scroll wheel  - Zoom in or out of apps pinned to the Start screen
Windows logo key+C - Open the Charms
Windows logo key+C  - Open the commands for the app
Windows logo key+F - Open the Search charm to search files
Windows logo key+H  - Open the Share charm
Windows logo key+I - Open the Settings charm
Windows logo key+J - Switch the main app and snapped app
Windows logo key+K - Open the Devices charm
Windows logo key+O  - Lock the device orientation
Windows logo key+Q  - Open the Search charm to search apps
Windows logo key+V  - Cycle through notifications
Windows logo key+Shift+V  - Cycle through notifications in reverse order
Windows logo key+W  - Open the Search charm to search settings
Windows logo key+,  - Temporarily peek at the desktop
Windows logo key+Z  - Show the commands available in the app
Windows logo key+spacebar  - Switch input language and keyboard layout
Windows logo key+Ctrl+spacebar  - Change to a previously selected input
Windows logo key+Tab  - Cycle through open apps (except desktop apps)

Windows logo key+Ctrl+Tab  - Cycle through open apps (except desktop apps) and snaps them as they are cycled

Windows logo key+Shift+Tab  - Cycle through open apps (except desktop apps) in reverse order

Windows logo key+PgUp  - Move the Start screen and apps to the monitor on the left (Apps in the desktop won’t change monitors)

Windows logo key+PgDown  - Move the Start screen and apps to the monitor on the right (Apps in the desktop won’t change monitors)

Windows logo key+Shift+period (.)  - Snaps an app to the left
Windows logo key+period (.)  - Snaps an app to the right


General Key Board Shortcuts

F1  - Display Help
F2  - Rename the selected item
F3  - Search for a file or folder
F4  - Display the address bar list in Windows Explorer
F5  - Refresh the active window
F6  - Cycle through screen elements in a window or on the desktop
F10  - Activate the menu bar in the active app
Alt+F4  - Close the active item, or exit the active app
Alt+Esc  - Cycle through items in the order in which they were opened
Alt+underlined letter  - Perform the command for that letter
Alt+Enter  - Display properties for the selected item
Alt+spacebar  - Open the shortcut menu for the active window
Alt+left arrow  - Back
Alt+right arrow  - Forward
Alt+Page Up  - Move up one screen
Alt+Page Down  - Move down one screen
Alt+Tab  - Switch between open apps (except desktop apps)

Ctrl+F4  - Close the active document (in apps that allow you to have multiple documents open simultaneously)

Ctrl+A  - Select all items in a document or window
Ctrl+C (or Ctrl+Insert)  - Copy the selected item
Ctrl+R (or F5)  - Refresh the active window
Ctrl+V (or Shift+Insert)  - Paste the selected item
Ctrl+X  - Cut the selected item
Ctrl+Z  - Undo an action
Ctrl+Y  - Redo an action
Ctrl+plus (+) or Ctrl+minus (-)  - Zoom in or out of apps pinned to the Start screen
Ctrl+scroll wheel  - Zoom in or out of apps pinned to the Start screen
Ctrl+ mouse scroll wheel  - Change the size of desktop icons
Ctrl+right arrow  - Move the cursor to the beginning of the next word
Ctrl+left arrow  - Move the cursor to the beginning of the previous word
Ctrl+down arrow  - Move the cursor to the beginning of the next paragraph
Ctrl+up arrow  - Move the cursor to the beginning of the previous paragraph
Ctrl+Alt+Tab  - Use the arrow keys to switch between all open apps
Ctrl with an arrow key+spacebar  - Select multiple individual items in a window or on the desktop
Ctrl+Shift with an arrow key  - Select a block of text
Ctrl+Esc  - Open the Start screen
Ctrl+Shift+Esc  - Open Task Manager
Ctrl+Shift  - Switch the keyboard layout when multiple keyboard layouts are enabled
Shift+F10  - Display the shortcut menu for the selected item

Shift with any arrow key  - Select more than one item in a window or on the desktop, or select text within a document

Shift+Delete  - Delete the selected item without moving it to the Recycle Bin first
Right arrow  - Open the next menu to the right, or open a submenu
Left arrow  - Open the next menu to the left, or close a submenu
Esc  - Cancel the current task


Dialog Box Shortcut Keys

F1  - Display Help
F4  - Display the items in the active list
Ctrl+Tab  - Move forward through tabs
Ctrl+Shift+Tab  - Move back through tabs
Ctrl+N (Number 1-9)  - Move to Nth tab
Tab  - Move forward through options
Shift+Tab  - Move back through options
Alt+underlined letter  - Perform the command or select the option for that letter
Enter  - Replace clicking the mouse for many selected commands
Spacebar  - Select or clear the check box if the active option is a check box
Backspace  - Open a folder one level up if a folder is selected in the Save As or Opendialog box
Arrow keys  - Select a button if the active option is a group of option buttons


Windows logo Key Shortcut Keys

Windows logo key+F1  - Open Windows Help and Support
Windows logo key  - Display or hide the Start menu
Windows logo key+B  - Set focus in the notification area
Windows logo key+C  - Open the Charms
Windows logo key+C  - Open the commands for the app
Windows logo key+D  - Display and hides the desktop
Windows logo key+E  - Open Computer
Windows logo key+F  - Open the Search charm and search file
Windows logo key+G  - Cycle through gadgets on the desktop
Windows logo key+H  - Open the Share charm
Windows logo key+I  - Open the Settings charm
Windows logo key+J  - Switch the main app and snapped app
Windows logo key+K  - Open the Devices charm
Windows logo key+L  - Lock your PC or switch users
Windows logo key+M  - Minimize all windows
Windows logo key+O  - Lock device orientation
Windows logo key+P  - Choose a presentation display mode
Windows logo key+Q  - Open the Search charm and search apps
Windows logo key+R  - Open the Run dialog box
Windows logo key+T  - Cycle through apps on the taskbar
Windows logo key+U  - Open Ease of Access Center
Windows logo key+V  - Cycle through notifications
Windows logo key+Shift+V  - Cycle through notifications in reverse order
Windows logo key+W  - Open the Search charm and search settings
Windows logo key+X  - Opens the Quick Link menu
Windows logo key+,  - Temporarily peek at the desktop
Windows logo key+Z  - Show the commands available in the app
Windows logo key+Pause  - Display the System Properties dialog box
Windows logo key+Ctrl+F  - Search for PCs (if you’re on a network)
Windows logo key+Shift+M  - Restore minimized windows on the desktop

Windows logo key+number  - Start the desktop app pinned to the taskbar in the position indicated by the number. If the app is already running, switch to that app.

Windows logo key+Shift+number  - Start a new instance of the desktop app pinned to the taskbar in the position indicated by the number

Windows logo key+Ctrl+number  - Switch to the last active window of the desktop app pinned to the taskbar in the position indicated by the number

Windows logo key+Alt+number  - Open the Jump List for the desktop app pinned to the taskbar in the position indicated by the number

Windows logo key+Ctrl+Shift+number  - Open a new instance of the desktop app located at the given position on the taskbar as admin

Windows logo key+Tab  - Cycle through open apps (except desktop apps)

Windows logo key+Ctrl+Tab  - Cycle through open apps (except desktop apps) and snaps them as they are cycled

Windows logo key+Ctrl+B  - Switch to the app that displayed a message in the notification area
Windows logo key+up arrow  - Maximize the desktop window
Windows logo key+down arrow  - Minimize the desktop window
Windows logo key+left arrow  - Maximize the desktop window to the left side of the screen
Windows logo key+right arrow  - Maximize the desktop window to the right side of the screen

Windows logo key+Home  - Minimize all but the active desktop window (restores all windows on second stroke)

Windows logo key+Shift+up arrow  - Stretch the desktop window to the top and bottom of the screen

Windows logo key+Shift+down arrow  - Restore/minimize active desktop windows vertically, maintaining width

Windows logo key+Shift+left arrow or right arrow  - Move a window in the desktop from one monitor to another

Windows logo key+spacebar  - Switch input language and keyboard layout
Windows logo key+Ctrl+spacebar  - Change to a previously selected input
Windows logo key+Enter  - Open Narrator

Windows logo key+PgUp  - Move the Start screen and apps to the monitor on the left (Apps in the desktop won’t change monitors)

Windows logo key+PgDown  - Move the Start screen and apps to the monitor on the right (Apps in the desktop won’t change monitors)

Windows logo key+Shift+period (.)  - Snaps an app to the left
Windows logo key+period (.)  - Snaps an app to the right
Windows logo key+Tab  - Cycle through opens apps (except desktop apps)

Windows logo key+Shift+Tab  - Cycle through opens apps (except desktop apps) in reverse order

Windows logo key+Ctrl+Tab  - Cycle through opens apps (except desktop apps) and snaps them as they are cycled

Windows logo key+/  - Initiate IME reconversion
Windows logo key+Alt+Enter  - Opens Windows Media Center
Windows logo key+plus (+) or minus (-)  - Zoom in or out (in Magnifier)
Windows logo key+Esc  - Exit Magnifier


File Explorer Shortcut Keys

Alt+D  - Select the address bar
Ctrl+E  - Select the search box
Ctrl+F  - Select the search box
Ctrl+N  - Open a new window
Ctrl+W  - Close the current window
Ctrl+mouse scroll wheel  - Change the size and appearance of file and folder icons
Ctrl+Shift+E  - Display all folders above the selected folder
Ctrl+Shift+N  - Create a new folder
Num Lock+Asterisk (*)  - Display all subfolders under the selected folder
Num Lock+plus (+)  - Display the contents of the selected folder
Num Lock+minus (-)  - Collapse the selected folder
Alt+P  - Display the preview pane
Alt+Enter  - Open the Properties dialog box for the selected item
Alt+right arrow  - View the next folder
Alt+up arrow  - View the parent folder
Alt+left arrow  - View the previous folder
Backspace  - View the previous folder
Right arrow  - Display the current selection (if it’s collapsed), or select the first subfolder
Left arrow  - Collapse the current selection (if it’s expanded), or select the parent folder
End  - Display the bottom of the active window
Home  - Display the top of the active window
F11  - Maximize or minimize the active window


Taskbar Shortcut Keys

Shift+click on a taskbar button  - Open a app or quickly open another instance of a app
Ctrl+Shift+click on a taskbar button  - Open a app as an administrator
Shift+Right-click on a taskbar button  - Show the window menu for the app
Shift+Right-click on a grouped taskbar button  - Show the window menu for the group
Ctrl+Click on a grouped taskbar button  - Cycle through the windows of the group


Ease of Access Shortcut Keys

Right Shift for eight seconds  - Turn Filter Keys on and off
Left Alt+Left Shift+PrtScn  - Turn High Contrast on or off
Left Alt+Left Shift+Num Lock  - Turn Mouse Keys on or off
Shift five times  - Turn Sticky Keys on or off
Num Lock for five seconds  - Turn Toggle Keys on or off
Windows logo key+U  - Open the Ease of Access Center


Magnifier Shortcut Keys

Windows logo key+plus (+) or minus (-)  - Zoom in or out
Ctrl+Alt+spacebar  - Preview the desktop in full-screen mode
Ctrl+Alt+D  - Switch to docked mode
Ctrl+Alt+F  - Switch to full-screen mode
Ctrl+Alt+I  - Invert colors
Ctrl+Alt+L  - Switch to lens mode
Ctrl+Alt+R  - Resize the lens
Ctrl+Alt+arrow keys  - Pan in the direction of the arrow keys
Windows logo key+Esc  - Exit Magnifier


Narrator Shortcut Keys

Space or Enter  - Activate current item
Tab and arrow keys  - Move around on the screen
Ctrl  - Stop reading
Caps Lock+D  - Read item
Caps Lock+M  - Start reading
Caps Lock+H  - Read document
Caps Lock+V  - Repeat phrase
Caps Lock+W  - Read window
Caps Lock+Page Up/Down  - Increase or decrease the volume of the voice
Caps Lock+plus (+) or minus (-)  - Increase or decrease the speed of the voice
Caps Lock+spacebar  - Do default action
Caps Lock+left or right arrows  - Move to previous/next item
Caps Lock+F2  - Show commands for current item
Press Caps Lock twice in quick succession  - Turn Caps Lock on or off
Caps Lock + Esc  - Exit Narrator


Narrator touch Shortcut Keys

Tap once with two fingers  - Stop Narrator from reading
Tap three times with four fingers  - Show all Narrator commands (including the ones not in this list)
Double-tap  - Activate primary action
Triple-tap  - Activate secondary action
Touch or drag a single finger  - Read what’s under your finger
Flick left/right with one finger  - Move to next or previous item
Swipe left/right/up/down with two fingers  - Scroll
Swipe down with three fingers  - Start reading on explorable text
Read More
Designed By Seo Blogger Templates